Multi-Level Workflow
- We are creating a 3 level workflow which will start from end user and it will go for Manager’s Approval at Stage 1 and after that it will go through stage 2 and stage 3 respectively.

- If either one of the users in 2nd or 3rd stage approving the request then it will be approved and will go to the next level.
1.
Creating a composite:
- At first we will create a composite by running the ant command:
cd
<OIMHOME>/server/workflows/new-workflow
ant -f new_project.xml
- It
will ask for below details:
Please enter application name:
MyMultiLevelApp
Please enter project name:
MyMultiLevelProj
Please enter the service name for the
composite. This needs to be unique across applications:
MyMultiLevelServ
2.
Customization in Jdeveloper:
- Then open the MyMultiLevelApp.jws file using Oracle JDeveloper.

- Go to composite.xml file in source mode and edit as below: <property name="bpel.preference.oimurl">t3://lcosoim4a.cos.agilent.com:14000/</property>

- Then go to ApprovalProcess.bpel file and add 5 variables as oimurl, PL1, SL1, PL2 & SL2.


-
Then Drag and drop Assign activity after AssignRequestWSURL activity and rename it as AssignOimUrl.
- Double click on AssignOimUrl and go to expression.

- Then in functions select BPEL XPath Extension Functions, then select getPreference ; then insert into expression then give the expression as below:

- Then add Java Embedding activity below the AssignOIMUrl activity and rename it to Java_Embedding1.

- Here a simple hardcoded code is used for testing purpose as below:

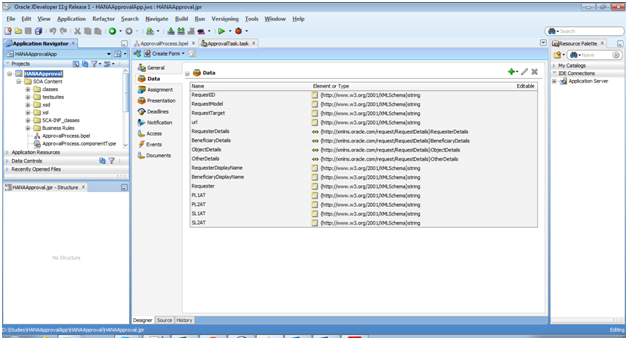
- Go to ApprovalTask.task go to Data tab and add String Payload as below:

- Add 4 variables as PL1AT, PL2AT, SL1AT and SL2AT.
- The values obtained from java_embedded will be passes as string payload to the human task using these variables.
- Now go to Human Tasks in ApprovalProcess.bpel. Go to copy rules tab.
- Map the variables e.g.PL1 to task: payload any Type as shown below:
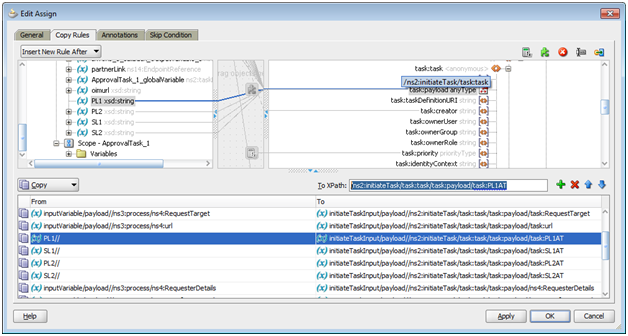
- Then append the value at the end as “/task:PL1AT”. Do this for all the 4 variables.

- Go to Approvaltask.task -> Assignment tab. Create 3 stages as shown below.


- Change this setting for vote percentage so that if 1 person approves it then it will go to the next level.

- Double click on Manager block and edit the payload as shown below :


- Entry should be like below:
- Do the same for other stages also

3. Deploy in SOA:
- Then we have to deploy it in SOA server. Follow the below screenshots for the same:


·
Then
we will deploy the jar file sca_MyMultiLevelProj_rev1.0 in /em console.


- Then Finish the deployment.

·
Then
Login in /sysadmin as xelsysadm. Go to Approval Policy.
·
Create
an Approval Policy as MYMultiAP
(Operational Level) as shown below:

· Attach
the Approval Policy to Application Instance MyConnector in scope & in Approval Process select the MyMultiLevelProj 1.0.


5.
Testing:
· Then
raise a request for End-user e.g. MyTestUser1 for Application Instance MyConnector.
· First
the request will go to the user’s manager e.g. MYTESTMANAGER1 and after his approval the request will
go to Primary Level and then to Secondary Level.
· The
request should transfer from Primary to Secondary and from Secondary to
Provisioned state if at least one member approving the request in each stage.

*********************************The
End********************************************
**** Thanks for visiting ****
**** Thanks for visiting ****


